Snack Boards 101: How to build the perfect snack board (with Pesto White Bean Dip and Roasted Curry Chickpeas)
Happy New Year friends! Hope you’re still digging into that fresh start feeling that comes with January and that the joys of the holiday season don’t feel too distant. I had a relaxing few weeks spent hanging with friends and family and it was just what I needed. One of the best nights for me was a night spent at home with my husband and kids where we all checked our phones at the door and played Yahtzee in front of a big fire, with votive candles twinkling all around and my son playing his latest Spotify playlist (he’s got killer taste in music).
Between them working and seeing their friends over the holiday break, there had not been much real family time and I really wanted the night to feel festive and fun. I decided to make a giant snack board because it’s the perfect way to put on a show and still sneak in lots of healthy choices.
Snack boards have been all the rage on Instagram and Pinterest for the last year or two, probably because visually they’re so interesting and colorful. They’re great for everything from parties and potlucks to picnics and casual dinners as they offer something for everyone - and in these days of people being gluten-free, dairy-free, meat-free or all of the above, that’s a big bonus.
Snack boards are different than cheese boards in that they are much more varied. Cheese boards are about the cheese. Snack boards can be about alllll the things and in my house that means lots of veggies, with dips and crackers being the perfect co-stars.

Here are some basic tips for creating the ideal snack board.
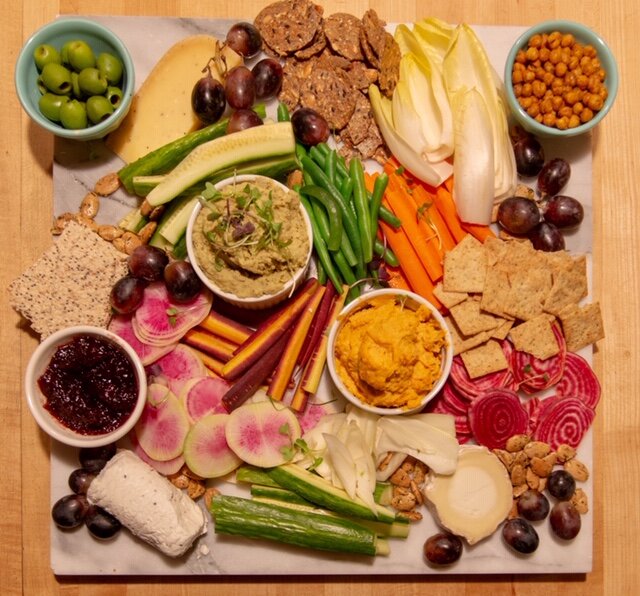
Focus on a wide range of colors, shapes and textures. This is a great opportunity to eat the rainbow! Not only are colorful vegetables beautiful, they are full of fiber, phytonutrients and antioxidants which is what makes them so dang good for you.
Variety will help keep it appealing so try and vary the shapes and sizes while keeping in mind that most of the things on the snack board will be used for dipping or have something spread upon them. Cucumber rounds or spears, orange and purple carrot sticks, curved endive leaves and celery sticks, thinly sliced watermelon radishes and candy cane beets, wedges of fennel, sturdy green beans and florets of broccoli all are nice contrasts.
Lately I’ve been partnering with Wild Harvest, and their products are perfect for making delicious and healthy dips for snack boards. Nearly 70% of their products are certified USDA organic and free from more than 140 undesirable ingredients which makes them the ideal things to stock in your pantry. I used their Tahini for my Butternut Squash Hummus and their Cannellini Beans for a Pesto White Bean Dip (recipe below).
Don’t forget to include a couple of cheeses (one hard and one soft like a goat cheese or brie) and a variety of crackers. You can also include some charcuterie like salami or prosciutto, some pickles or olives, and Marcona almonds or other nuts for saltiness and depth of flavor. I made these Roasted Curried Chickpeas (recipe below) using Wild Harvest Curry Powder and a can of their Garbanzo Beans and they were another easy and delicious addition.
Once you have your dips made and your veggies sliced and prepped, lay out everything that you plan on using. Put your dips into some small dishes or bowls then and find a large platter or wooden cutting board. Start by placing the dips on the board and then arrange everything else around them. If you have an overflow, then use 2 boards. Remember, anything goes, so have fun with it - and don’t forget to snap a few pics if you’re so inclined!
*This post is sponsored by Wild Harvest, but all opinions are my own.

Pesto White Bean Dip
Ingredients
Instructions
- Put the beans in a food processor and pulse until they are smooth.
- Remove to a bowl and stir in the pesto. Add lemon juice to taste.
- Season with salt and pepper (Can be prepared 1 day ahead).
- Stir dip before serving and garnish with a few microgreens or some chopped fresh herbs.

Roasted Curry Chickpeas
Ingredients
Instructions
- Preheat the oven to 375 degrees.
- Put the rinsed chickpeas on a dishtowel and gently roll them around until the skins start coming off. This is an important part of the process because they're a bit crispier when they are roasted without the skins.
- Put the beans in a bowl and toss them with 1 tablespoon of avocado or olive oil and 1/2 tsp of kosher salt.
- Spread them on a rimmed baking sheet and bake for 45 minutes, stirring once about halfway through.
- Take them out of the oven and toss them with 1 teaspoon of curry powder, and then let them cool for a few more minutes. They'll continue to get crispy as they cool.
Notes:
Note: you can substitute Wild Harvest® Chili Powder for the Curry Powder if you prefer or you can omit the extra spices altogether and eat them plain. They are delicious either way!